How to use Archipelago

Introduction:
The Archipelago program is 100% FREE to install and use and it is fully functional but if you don’t mind, send me an optional email as I’d like to know whether you like the program (or not) or tell me what you want changed and in return I will try to do my best to accommodate your wish and keep you updated about the latest developments, etc…
NOTE: if you have not yet installed Archipelago, download the 100% functional free program (for Windows only) from https://papaysailor.itch.io/archipelago-sailor-simulator there are instructions on how to install over there; really simple.
Click on this link to contact me by email
Rest assured that I will never disclose your email address to anyone as I hate spam as much as you do!
USING ARCHIPELAGO
Also see these helpful Tutorial YouTube Videos:
The program always starts with a simple “Scene” of a wide calm ocean, the sky and a couple of simple buoys. You are looking WEST and you are at the world’s “Origin”. Big colored “XYZ” coordinates show up at the origin and smaller XYZ at the “selected” object (a buoy at startup) and a tiny “+” floating over the waves at the center of the screen (this is a center pointer). The XYZ’s are RGB (Red, Green, Blue) denoting the (X, Y, Z) axis; these axis are sometimes useful but you can turn them off under the tab named “Other” (as well as other less-frequently-needed-options)
Startup screen 
For people with short attention span, this startup screen may look a little “boring” but wait! It gets better! Please keep reading:
You can move around your scene using the mouse (better to use a REGULAR MOUSE left/right button down and drag and wheel) or you can use the arrow keys (Up/Down/Left/Right arrows combined with Shift button and Ctrl button). I included a file Keys.txt in folder where the program installs; the file shows important keyboard “shortcuts” which are really convenient; you can also read this file using the program’s menu: “Help/Key Shortcuts” – the program also supports Joystick if you have one present.
ABOUT THE “CONTROL PANEL”:
You will soon notice that when you move the mouse pointer toward the left side of the window scene, the “CONTROL PANEL” side window will pop up. It has tabs “Main“, “Weather“, “Map” and “Other“. This is where you can control many important aspects of the simulation which will become obvious as you try to use them. I will explain below. Move the mouse pointer back toward the scene to make the control panel window disappear. There is also an important MENU at the top to load Files and “Situations” and to access the Help.
Startup Screen with Control Panel 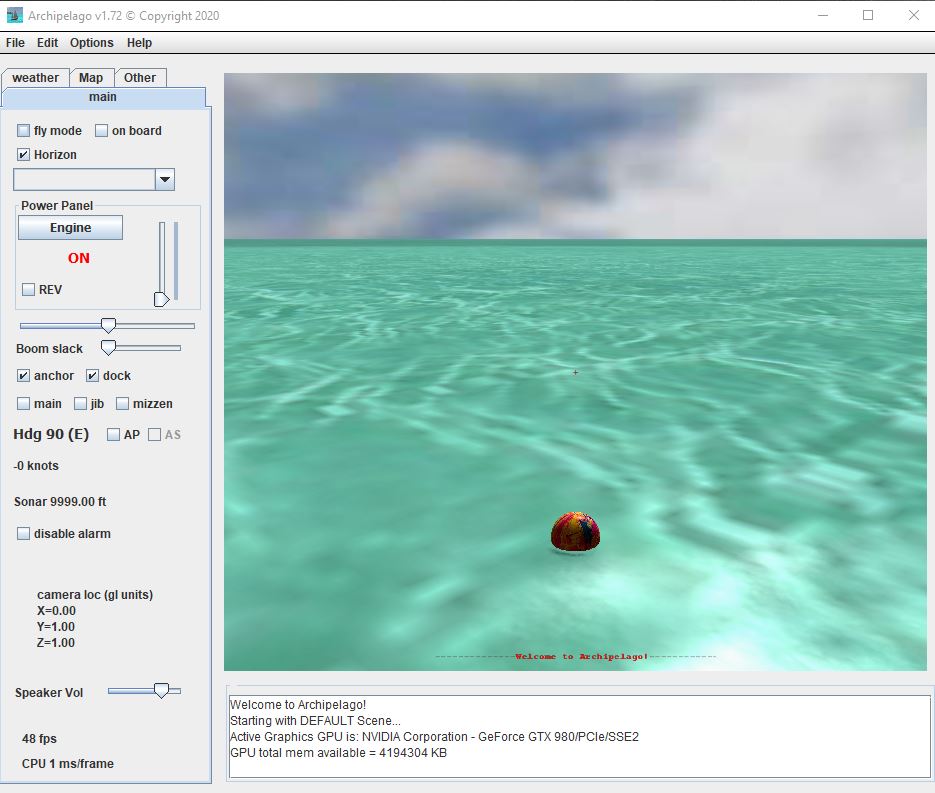
HINT: you may notice that after moving back to the scene you might sometimes have to click the mouse to get the “focus” back on that window for keyboard shortcuts to work as expected.
First you create a RANDOM TERRAIN by selecting from the menu “File/ New Archipelago”. You can also use the shortcut key N
 The terrain is always different unless you save it in a “Situation”(more about that below) It generates a number of terrains or groups of islands (10 exactly = “the Archipelago world”) and locates them randomly in your ‘world’. If you don’t like the terrain, just remove it (“File/Remove Archipelago” or Ctrl-N) and generate new ones until you like it.
 When happy with ‘your’ terrain you can start adding boats or structures (use menu “File / Load Model” … or use the Insert key). Models are Wavefront standard OBJ files and when loading they will be located at the position of the center-of-screen “pointer” (the small red “O”) cursor:
For example: File/Load Model/Marlow66/Marlow66.obj will return this yatch: 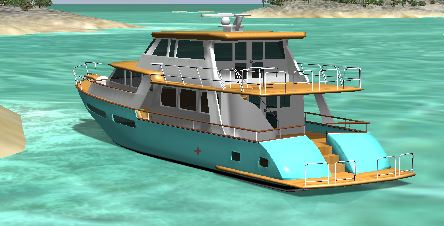 make sure you are pointing below the horizon when inserting an object, as you cannot place a model in the sky 😉
Note for advanced users: The program accepts any number of OBJ models and I included several: an OBJ file (and it corresponding material MTL file) that sometimes need to be slightly modified (they are text files) to look OK in Archipelago; a special file XOBJ is used to specify physical parameters like length, mass, orientation and whether it “floats” or not and many other optional parameters. There are many good sources of 3D models (free and not) in the internet (i.e: https://free3d.com/3d-models or https://cgtrader.com); I will explain somewhere else how to modify OBJ files; but for now if you want to add your own models, please send me an email and I’ll be glad to help you 🙂 Of course you can also try to figure it out by yourself by testing and using existing models as your guide, but be careful when modifying them as they will be overwritten when you update the program to a newer version.
SITUATIONS:
Obviously you don’t have to recreate every Situation every time! You can save it and later re-load it. To save your “situation” use “File/Save Situation” or use Ctrl-Shift-S; this will save the isles (terrain) and all the current models and structures in their current positions; also saves time-of-day, weather etc… which you can reload some other time. You will notice that within a “Situation” you can have multiple “Cases” that could share the same terrain, but you could also saves cases with different terrain in the same situ file. The shortcut to load a situation is Shift-S
You can share Situations with your friends: from the Files menu use Export/Import which will ZIP / UNZIP any situation. They use the Import Situation and load it by pointing to the ZIP file anywhere in their hard drive. Situations are stored in the /Situation folder
FLY MODE, ONBOARD and HORIZON:
 In the “main” tab notice the check-boxes labeled “fly mode”, “on board” and “Horizon”; these control how the “camera” (YOU) move in relation to the scene. In “fly mode” (F key toggles this mode) you are free to “fly” over your world as if in a crude airplane; use the mouse with a wheel, keyboard or joystick(if present) to move around. Practice! You can also use the CURSOR keys to look/move around (the “SHIFT” button accelerates the movement).
When you load an OBJ model, it is automatically “Selected” and shows up in the big button and you have to select it to ‘move’ , rotate or translate the model (Use the “Other” Tab).
Check “On Board”(O key toggles this mode) to tie the view to the selected model (if a boat, the camera will move with it. When “on-board” you can check the “horizon” (H key to toggle) to keep it horizontal; un-check “horizon” for more realistic view … but may get a little dizzy… and start feeling “sea sick”; I don’t want you to throw-up and make a mess in my boat!
HINT: When ‘flying around’, fly close to a boat and press “O” to get on-board! Easy! You can press “O” again to get off-board but the model remains selected.
More about ADDING MODELS TO THE SCENE:
When adding objects (models) to your scene, they will be initially placed at where the red “o” center screen pointer is at; notice that the program won’t let you add a model when pointing above the horizon except on LAND when placing structures, like a house. (earlier versions of Archipelago had a slightly different method for inserting objects; it is easier now!) Press your keyboard’s “Insert” button; a Windows File Explorer standard dialog is displayed; under the “models” folder, select an OBJ file for a boat (i.e: vagabond, bochica, seaangler, marlow66 etc…) which obviously float, OR you can select a non floating structure (houses, docks etc…). The object remains “selected” so you can move it, rotate or orbit around it. More about this later.
Only ONE object/model (OBJ) can be “selected” at a time: either a “boat” or a “structure”. When an object is selected you can rotate it or move it around using some options under the “Other” tab; you can move them around (using up/down/left/right cursor keys) if you first check “rotate/translate model” (Ctrl-R, Ctrl-T). Notice that a boat will be undocked when rotating. IMPORTANT: after you are done moving, translating or rotating an object in your scene remember to TURN the “rotate/translate model” checkbox OFF … or you will not be able to ‘move around’ as usual!
Boats (and sailboats) are automatically “Docked” when you initially load them; even if there is no real “dock” model nearby. Free the boat by using the toggle key Ctrl-D . The difference between “anchored (Ctrl-A)” and “docked (Ctrl-D)” is that when anchored the boat is free to rotate with the wind and drift a bit; when docked it is not. Besides Rotate/Translate you can also MOVE IT (Alt-M); as a matter of fact, ‘moving’ is the only way to free yourself if your boat gets ‘grounded’ in the shallows. To move you can just ‘center point’ to where you want to move the selected model and press Alt-M. You can also rotate/translate by using Ctrl-R or Ctrl-T.
REMINDER: all keyboard shortcuts are displayed under menu Help – I encourage you to get used to these shortcuts!
For Boats/Sailboats use the “E” key to start/stop engine (or the Engine button in the Power Panel); “R” for reverse (or the Rev checkbox); following many game standards, ASDWX keys control typical things: “W” and “X” for throttle up/down (or the vertical slidebar). Rudder is controlled with “A” (left), “S” (center) and “R” (right) (or horizontal slidebar).
For sailboats, use the “M”, “J”, “Ctrl-M” to rig up/down the “Main”, “Jib” and “Mizzen”(if present); use the above keys with Shift to rig up; no Shift to rig down; to lose or tighten the boom with “B” and “Ctrl-B” … or use the control panel corresponding slide bar.
When navigating long distance (unless you are feeling more “adventurous”) you may want to use the “AutoPilot” and/or the “AutoSail” features; just point in the direction you want to go and press “Ctrl-P” to keep heading in that direction and “Ctrl-S” to let the program automatically adjust sails to optimal position according to wind/boat direction/speed; remember you can still jump from one boat to another (use the BIG selection button or use “Q” key) and the program remembers your position in relation to the boat unless you are “flying”. If you are flying, get close to the boat and press “O” to get “on-board”.
WEATHER TAB
The “weather” tab is used to change things like wind strength, gusts and direction; these also control the deep-sea wave height and direction. Wave length is controlled by Depth. Notice that wind GUSTS do not affect waves but will definitively affect sailing; also in this tab you can add FOG effects and you can change time-of-day. Here you have to play a little bit to make it “realistic”. For instance: in deep sea you should increase depth which naturally will increase wave length, like in the real world.
The Weather tab 
You can also control overcast clouds, and rain and thunder. But to have any rain, you cannot have completely clear skies. Also to have thunder and lightning, rain must be at at least 90%. Please play with all these options for the most realistic desired conditions. There are no keyboard shortcuts for weather options; you must use the weather tab.
MAP, MARKERS and ROUTES:
The “Map” tab has an abbreviated MINI-MAP which show your position (red square) in relation to all (ten) randomly generated terrains (green) and gaze direction. It will also show position of other boats in your scene (orange)
Map Simple 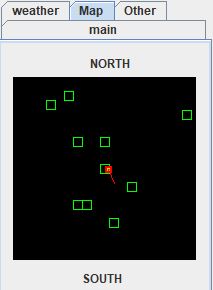 More Detail Checked
When “show more detail” is checked you can zoom in/out (using the horizontal slidebar) your closest terrain and you can add “Markers” to your scenery (cone buoys): by CLICKING ON THE MINI-MAP. You can “fly” to those markers to move them (Alt-M) if you need to adjust.
Markers are the numbers in green 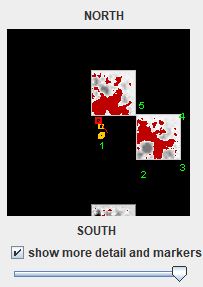
Any boat can be selected to follow the ROUTE by pressing “Assign route from markers” and then “START assigned route”; of course you have to be “piloting” (select) that particular boat. Remember you can switch to any boat at any time!
Markers Assignment 
Of course different boats CAN HAVE different routes using this mechanism and the routes are not necessarily visible buoys unless you press “Place markers at route”. If you are following a route you can temporarily “pause” following and later “resume”. These routes and the markers are saved in the Situation file.
Now you can see how to use the MAP, MARKERS and ROUTES to set up a race against the computer: this is because any boat/sailboat that has a route assigned and which is NOT your currently selected boat will automatically follow the route using AutoPilot and AutoSail!
Bochica approaching marker # 3 
The “Other” Tab
This tab contains things that are rather optional; like whether you like showing the global XYZ axis or not. Also important nice-to-have options that may or may not affect performance like: shadows, choppy waters, waves spray, reflections, ropes and pulleys and Kelvin wakes.
If your CPU / GPU is struggling to keep up the frame rate, you can try turning off some of these options. It will be saved as your preference for the next time you boot-up the program.
But the highest impact in graphics performance (FPS = frames per second) is of course the complexity of your scene, the quality of your graphics card, CPU and total available memory
It is notable that this is the tab where you can “manually” move or rotate any currently selected object.
Rotate/Translate or move ![]()
You can also take a “ScreenShot”, reset the Camera view (back to the origin) and you may choose to show/hide the global XYZ axis and/or the Selected object XYZ axis.
But the highest impact in graphics performance (FPS = frames per second) is of course the complexity of your scene, the quality of your graphics card, CPU and total available memory
DEAR VISITOR: IF this GAME/SIMULATOR PROGRAM “catches-on” (meaning: lots of downloads + active user feedback) I will certainly add a MULTIPLAYER option …. so, it is up to YOU! Tell you friends about this awesome program!

You must be logged in to post a comment.